
If you use a Baby Brezza sterilizer in the United States, the basic process is simple: wash the bottles and parts, add the correct amount of water, load the unit, choose a cycle, and let the machine sterilize and dry the items. The exact buttons and cycle times vary by model, so check the manual for your specific Baby Brezza sterilizer before the first use.
This guide covers common models such as the Baby Brezza One-Step Sterilizer Dryer and Superfast Sterilizer Dryer. It also explains how to clean the machine, fix common problems, and store bottles safely after sterilization.
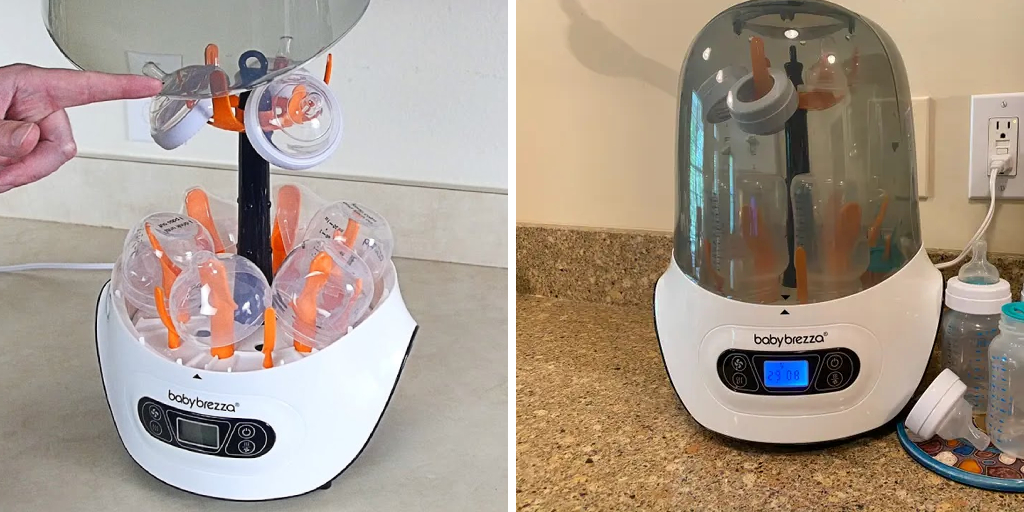
Before You Use the Baby Brezza Sterilizer
Prepare clean, heat-safe parts before starting a cycle. A sterilizer does not replace washing. Milk, formula, oils, and food residue can remain on a bottle unless you clean the parts first.
You will need:
- Washed bottles and bottle parts
- Clean water
- The Baby Brezza sterilizer
- The water-measuring cup that came with the unit
- A clean drying or storage area
- The user manual for your exact model


Check which Baby Brezza model you have
Baby Brezza sells more than one sterilizer. Controls, capacity, drying settings, and cycle times may differ.
Common models include:
- One-Step Sterilizer Dryer Advanced: Sterilizes, dries, and may keep items sterile inside the closed unit.
- Superfast Sterilizer Dryer: Uses a shorter combined cycle on some versions.
- Sterilizer-only models: Use steam but may not include a drying function.
Do not use instructions for one model as a substitute for the manual for another. Look for the model name on the front, base, box, or rating label.
Wash the bottles and parts first
Use warm water and dish soap made for washing feeding items. Take apart every bottle before washing. Separate:
- Bottles
- Nipples
- Collars or rings
- Caps
- Valves
- Vent inserts
- Breast pump parts, if the manual says they are safe to sterilize
Use a bottle brush for the inside of bottles and a small brush for nipples, valves, and vents. Rinse each part well.
The Centers for Disease Control and Prevention recommends cleaning infant feeding items after each use and allowing them to air-dry fully. For young babies, especially those under 2 months old, babies born early, or babies with a weakened immune system, follow your health care provider’s advice about sterilizing feeding items.
Confirm that each item is heat-safe
Only place parts in the sterilizer if the product maker says they can handle steam and heat. Check the bottle, nipple, breast pump, and accessory instructions.
Do not place these items in the sterilizer unless the manufacturer specifically approves them:
- Electronic pump parts
- Batteries
- Chargers
- Tubing that should not get wet
- Items with paper labels
- Items made from heat-sensitive plastic
- Medication containers
- Anything with an electrical part
How to Use a Baby Brezza Sterilizer
The safest method is to load the machine with washed parts, use the supplied water measure, select the right program, and leave the lid closed until the cycle ends and the steam cools.


1. Place the sterilizer on a safe surface
Set the unit on a level, dry surface near an electrical outlet. Keep it away from the edge of the counter.
Leave space around the vents. Do not place the sterilizer under a cabinet if steam could damage the cabinet or become trapped above the machine.
Keep the power cord away from hot surfaces and areas where a child could pull it down.
2. Add water to the heating plate
Remove the lower basket or bottle rack if your model requires this. Use the measuring cup supplied with the sterilizer.
Pour the amount of water listed in the manual onto the stainless-steel heating plate. Many steam sterilizers use a small measured amount of water, but the correct amount depends on the model and cycle.
Do not guess the amount. Too little water may stop the cycle early or cause the unit to overheat. Too much water may extend the cycle or leave water inside the machine.
Use the water type recommended in your manual. If your local tap water leaves mineral deposits, filtered or distilled water may reduce buildup, but check the manual before changing water types.
3. Load bottles with openings facing down
Place bottles upside down on the bottle rack or holder. The bottle opening should face downward so steam can enter the bottle.
Arrange the other parts so steam can reach all surfaces:
- Place nipples with the opening facing down or as shown in the manual.
- Put collars and caps in the small accessory basket.
- Keep valves and vents separated.
- Do not stack small parts on top of one another.
- Leave space between items.
A crowded basket can block steam. The machine may run normally even when poor loading prevents full exposure.
4. Put the lid on correctly
Place the lid on the base. Make sure it sits flat and closes fully.
Do not run the machine with the lid partly open. Do not lift the lid during the cycle unless you must stop the unit. Opening it releases hot steam and may reduce the sterilizing effect.
5. Select the correct cycle
Choose the cycle that matches your needs and your model.
Typical settings may include:
- Sterilize and dry: Uses steam first, then warm air to dry the parts.
- Sterilize only: Uses steam but does not run the drying stage.
- Dry only: Dries already-clean parts but does not sterilize them.
- Storage mode: Keeps the lid closed and may run periodic drying cycles on certain models.


A dry-only cycle is not a sterilization cycle. If the parts need sterilizing, select the sterilize function or the combined sterilize-and-dry function.
The display or buttons may show different names on different models. Follow the labels on your unit and the instructions in its manual.
6. Start the cycle
Press the start button. Keep hands and face away from the steam outlet.
The machine may make sounds as it heats, releases steam, or switches to drying. This is normal. Do not move the unit while it is operating.
7. Wait before opening the lid
When the cycle ends, allow the unit to cool before opening it. The lid, bottles, rack, and steam inside can be hot.
Open the lid away from your face. Use clean hands or clean tongs to remove the parts. If the cycle includes drying, the parts may be ready to use once they are cool and dry.
If items are still wet, do not assume the wet parts are ready for long-term storage. Move them to a clean drying area or run the correct drying cycle if the manual allows it.
8. Use or store the parts safely
If you open the lid and remove the parts, handle them with clean hands. Touch only the outside of bottles when possible.
If your Baby Brezza model has a closed storage function, keep the lid shut after the cycle. Opening the lid allows new germs and dust to enter.
Use sterilized parts promptly. If a part touches a dirty surface, drops on the floor, or is handled with unwashed hands, wash it again before use.

How to Use the Drying and Storage Functions
The drying function removes moisture after steaming. It does not clean dirty items, and the drying-only function does not sterilize them.
Sterilize and dry
Use this setting when you want to wash, steam-sterilize, and dry bottles in one process.
Before starting:
- Wash and rinse every part.
- Shake off excess water if needed.
- Load the parts with space between them.
- Add the correct water amount.
- Select the combined cycle.
- Leave the lid closed until the cycle finishes.
A complete combined cycle can take longer than sterilization alone. The total time depends on the Baby Brezza model, the selected drying time, the number of items, and the amount of water.
Sterilize only
Use sterilize-only when you plan to use the items soon or dry them separately.


After the cycle:
- Let the steam settle.
- Open the lid carefully.
- Place parts on a clean, unused drying mat or rack.
- Keep them away from sinks, raw food, pets, and household dust.
- Do not wipe the inside of bottles with a kitchen towel.
A clean air-drying area is often better than a cloth towel, which can transfer germs or lint.
Dry only
A dry-only cycle is useful for parts that have already been washed and sterilized, or for clean parts that only need drying.
It does not replace the steam cycle. Do not use dry-only if your goal is to sterilize feeding items.
Storage mode
Some Baby Brezza models can keep items inside the closed unit after sterilizing and drying. The exact storage period and drying behavior depend on the model.
Use storage mode only as described in the manual. Keep the lid closed. If you open the unit, handle the items with clean hands and consider the contents no longer protected from new contamination.

How to Clean a Baby Brezza Sterilizer
Clean the sterilizer often to prevent mineral scale, residue, and odors. Unplug the unit and let it cool before cleaning.
Clean the baskets and lid
Remove the baskets, rack, and other removable parts. Wash them with warm soapy water unless the manual says they are dishwasher-safe.
Rinse the parts well and let them dry. Wipe the inside and outside of the lid with a clean, damp cloth.
Do not immerse the electrical base in water. Do not spray cleaner into vents, buttons, or the power connection.
Descale the heating plate
Minerals from water can form a white or chalky layer on the heating plate. This buildup may affect heating and make the machine harder to clean.
Follow the descaling method in your Baby Brezza manual. Some manufacturers allow a mild acid solution, such as diluted white vinegar or citric acid, while others specify a different method.
A general cleaning process may involve:
- Unplugging and cooling the unit.
- Removing loose water from the base.
- Applying the approved descaling solution to the heating plate.
- Letting it sit for the time listed in the manual.
- Wiping away the loosened scale.
- Rinsing the plate as directed.
- Running a plain-water cycle only if the manual recommends it.
Never mix vinegar with bleach or other cleaning products. Do not scrape the plate with a sharp tool.


How often should you descale?
Descale when you see mineral buildup, notice a change in heating, or reach the cleaning interval in the manual. The needed frequency depends on water hardness and how often you use the sterilizer.
If you use the unit several times a day or live in an area with hard water, you may need to descale more often.

Baby Brezza Sterilizer Troubleshooting
Most problems come from incorrect water levels, mineral buildup, blocked steam paths, poor loading, or a lid that is not seated correctly.
| Problem | Likely causes | What to check |
|---|---|---|
| The unit does not start | No power, loose plug, lid not closed | Check the outlet, plug, lid, and manual |
| The cycle stops early | Too little water, overheating, sensor issue | Unplug, cool the unit, check the water measure |
| Bottles are still wet | Short dry setting, crowded load, blocked airflow | Use a longer approved dry cycle and leave space |
| Items are not fully exposed to steam | Parts stacked or facing the wrong way | Reposition bottles and small parts |
| White residue appears | Mineral scale from water | Descale according to the manual |
| The unit smells unusual | Residue, scale, or cleaning product | Clean and rinse the unit; stop use if the smell persists |
| Water remains on the heating plate | Excess water or incomplete cycle | Let the unit cool, then remove water as directed |
| The lid is hard to remove | Hot steam and pressure-like heat inside | Wait longer and open it away from your face |
If the unit will not turn on
Check that:
- The power cord is fully inserted.
- The outlet works.
- The lid is positioned correctly.
- The base is dry.
- The unit has cooled after a previous cycle.
Do not use the sterilizer if the cord is damaged, the base has been submerged, or the unit shows signs of electrical damage.
If the bottles are wet after drying
Wet bottles do not always mean the sterilization cycle failed. The drying stage may be too short for the load.
Try these steps:
- Check whether you selected sterilize-only.
- Choose a longer drying setting if your model offers one.
- Avoid overloading the basket.
- Place bottles upside down.
- Keep small parts from covering bottle openings.
- Check that the air vents are not blocked.
- Clean mineral buildup from the heating plate.
Do not dry parts with a used dish towel. Use a clean drying area or the approved drying cycle.
If the cycle stops or shows an error
Turn off and unplug the unit. Let it cool fully before checking the water level and load.
Do not repeatedly restart a hot or empty unit. If the same error returns after you follow the manual’s reset steps, contact Baby Brezza support or stop using the appliance until it is inspected.

Common Mistakes to Avoid
Avoid these errors when using a Baby Brezza sterilizer:
- Skipping the wash step: Steam cannot remove milk residue from dirty parts.
- Using the wrong water amount: Use the supplied measuring cup and model-specific instructions.
- Overloading the unit: Steam must reach every surface.
- Using the dry-only setting for sterilization: Dry heat alone may not provide the same steam process.
- Opening the lid during the cycle: This releases hot steam and interrupts the process.
- Touching sterilized parts with dirty hands: Clean hands help prevent recontamination.
- Using damaged parts: Cracked bottles, torn nipples, or damaged valves can create feeding or choking risks.
- Putting unsafe parts inside: Electronics and heat-sensitive items may be damaged.
- Ignoring scale: Mineral deposits can affect the heater and cycle performance.
- Mixing cleaning chemicals: Never combine bleach, vinegar, ammonia, or other cleaners.
Replace bottles, nipples, valves, and other feeding parts when they are cracked, cloudy, torn, warped, sticky, or difficult to clean. Follow the part manufacturer’s replacement guidance.
How Much Water Does a Baby Brezza Sterilizer Need?
The correct water amount depends on the Baby Brezza model and selected cycle. Use the measuring cup included with the unit and follow the manual.
Do not use a general online measurement if it conflicts with your manual. A small change in water volume can affect how long the heating plate runs and whether the cycle completes correctly.
The water amount may also differ between:
- Sterilize-only
- Sterilize-and-dry
- Dry-only
- Storage settings
- Different versions of the same product
When in doubt, identify the model number and download the matching U.S. instruction manual from Baby Brezza’s official support site.

Is a Baby Brezza Sterilizer Necessary?
A sterilizer can make steam treatment and drying more convenient, but it is not the only safe way to clean feeding items.
For many healthy older babies, careful washing with hot water and dish soap may be enough. The need for extra sterilization depends on the baby’s age, health, feeding equipment, local guidance, and advice from the child’s health care professional.
Extra care may be needed for:
- Babies younger than 2 months
- Babies born prematurely
- Babies with a weakened immune system
- Babies who use feeding equipment with small valves or hard-to-clean parts
The machine also does not remove the need to wash hands, clean the counter, replace worn parts, or follow safe formula preparation instructions.

Baby Brezza Sterilizer Safety Checklist
Before each cycle, confirm the following:
- The bottles and parts are washed.
- Every part is heat-safe.
- The unit is on a level, dry surface.
- The water amount matches the manual.
- Bottles are loaded with openings facing down.
- Small parts are separated.
- The lid is closed.
- The steam outlet is clear.
- Children cannot reach the hot unit or cord.
- You will wait for the unit to cool before opening it.
Stop using the appliance and seek manufacturer support if it leaks, sparks, gives off a burning smell, repeatedly overheats, or has a damaged cord or plug.
Frequently Asked Questions
Can I put dirty bottles directly into a Baby Brezza sterilizer?
No. Wash and rinse bottles and parts first. The sterilizer uses steam to treat clean items; it does not remove formula, milk film, or food residue.
Can I use a Baby Brezza sterilizer for breast pump parts?
Only if the breast pump manufacturer says the parts are safe for steam sterilization and the parts fit without blocking airflow. Never place the pump motor, battery, charger, or other electrical parts in the sterilizer.
Do I need to dry bottles after sterilizing them?
Dry them before storage or use if they remain wet. Use the Baby Brezza drying cycle or place the parts on a clean air-drying rack. Avoid wiping the inside with a kitchen towel.
How long do items stay sterile in the Baby Brezza?
Items remain protected only while the unit stays closed and the storage function operates as described in the model’s manual. Once you open the lid or touch the parts, they can be exposed to new germs.
Can I use tap water in a Baby Brezza sterilizer?
Use the water type recommended in the manual. Tap water may be acceptable, but hard water can create scale. Filtered or distilled water may reduce mineral buildup when approved by the manufacturer.
Key Takeaways
- Wash every bottle and part before using the sterilizer.
- Use the correct water amount for your exact Baby Brezza model.
- Load bottles upside down and keep small parts separated.
- Select sterilize, sterilize-and-dry, or dry-only based on the task.
- Keep the lid closed until the cycle ends and the unit cools.
- Descale the heating plate when mineral buildup appears.
- Stop using the appliance if it leaks, overheats, sparks, or has electrical damage.
Conclusion
To use a Baby Brezza sterilizer safely, start with clean, heat-safe parts. Add the model-specific amount of water, load the items so steam can reach them, choose the correct cycle, and wait before opening the lid. Clean the baskets and heating plate regularly, and use the official manual whenever its instructions differ from general guidance.
Your next step is to find the model name or number on your unit and review its U.S. instruction manual for the exact water measure, cycle buttons, drying times, and descaling method.